Top 10 Tips To Improve Your Mix Translatability

Have you ever mixed a track to sound great in your studio space (whatever that may be), playing through your monitors or headphones, only to have it fall apart in the car, home studio, earbuds, PA system, etc.? If you have, you inherently know the importance of proper mix translatability.
Mix translatability, as the name would suggest, is a qualitative measurement of how a mix will translate between different playback systems and environments. A mix with great translatability will sound better and more consistent across various playback systems/environments.
So, if you're interested in getting your mixes to translate from the studio to the car, club, smartphone, or wherever/whatever else, this article is for you.
The top 10 tips to improve your mix translatability are:
1. Improve your monitoring situation
2. Get comfortable in your monitoring situation
3. Monitor differently inside and outside the studio
4. Find your preferred level but monitor at a variety of levels
5. Use reference mixes
6. Monitor in mono
7. Mix with reduced bandwidth
8. Take notes and make necessary adjustments
9. Hire a mastering engineer
10. Practice critical listening
In this article, we'll go through each of these tips in detail to better understand the strategies behind improving our mix translatability.
If you prefer taking in information via video, be sure to check out my video on the topic of mix translatability:
If you'd like to support my work and learn more about music production, please consider subscribing to my Substack.
Improve Your Monitoring Situation

My first tip for you is to improve your monitoring situation if possible.
This may seem obvious, but it's essential to have proper monitoring to get a great mix to begin with. Of course, we can only begin striving for optimal mix translatability if we can get a great mix to begin with.
If we can hear our mixes accurately (thanks in large part to flat, detailed monitoring and acoustic treatment), we can work with confidence, knowing that what we're hearing is a fairly precise reproduction of the mix's audio.
With proper monitoring, we're able to mix with greater precision to achieve more objective results. From there, we can mix in a way that will translate to other systems and environments.
Studio Monitors & Headphones
In terms of monitoring, it's important to be able to hear all frequencies fairly equally. Generally, a pair of relatively “flat” monitors (flat frequency response) will cover the majority of the audible frequencies, and adding a subwoofer will allow us to hear the extreme low-end.
Many home/small studios do without a subwoofer and, in doing so, neglect the low-end. I've been guilty of this myself. Though it's possible to get decent mixes without being able to hear the low-end, we need to be able to monitor it properly if we want the best, most detailed results and the greatest mix translatability (especially when playing back on huge subwoofer arrays in clubs and concerts).
Mixing on headphones is also possible, and we may be able to monitor a wider range of frequencies with the proper headphones. Although the discussion as to whether we can mix on headphones properly continues to this day, they are certainly an effective way to monitor the mix. Headphones tend to offer greater detail at the expense of exaggerated space.
I'm of the opinion that so long as you're familiar and comfortable with how your headphones sound, nothing is stopping you from crafting great mixes on them. I'll discuss this “familiarity factor” in greater detail in the next section.
Monitor Positioning
Beyond the monitoring itself, we should also consider how our monitors are placed without our room. Note that a benefit of using headphones is that they effectively remove the room from the equation.
For the purposes of this article, we'll focus on nearfield monitors. Farfield monitors are pretty well only used in high-end, high-budget studios beyond the scope of this writing.
When monitoring through studio monitors, it's important that we position ourselves in the ideal listening position or “sweet spot”.
For the best balance, it's paramount that we position ourselves equidistant to each monitor. It's generally advised to sit so that your ears are the same height as the monitor tweeters.
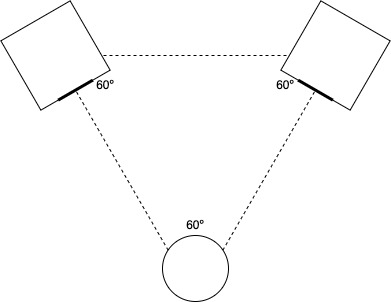
To extend this idea further, having the listening position and the two nearfields positioned in an equilateral triangle would be considered the “ideal” position.
The following diagram represents the equilateral triangle “sweet spot”, with the squares representing the monitors and the circle representing our listening position:
Furthermore, it's important that we position the monitors, and by extension, ourselves, appropriately as well.
To avoid unnecessary phase issues, it's generally best to have the monitors placed along the longest wall rather than near corners. Having each monitor the same distance from the longest wall will help maintain the stereo imaging (versus having them at odd angles within the room).
The goal is to have different distances between the monitor and the rear wall, side wall, ceiling and floor. If we can manage this, there will be fewer phase issues than if all distances were equal.
Another factor to consider is to keep nearfield monitors positioned away from their common wall by a few feet when possible to avoid unnecessary buildup of bass frequencies and phase issues from the reflections against the close wall.
Note that headphones help simplify this factor significantly, as they're always positioned appropriately, with the drivers right next to our ears.
Room Acoustics
In addition to proper monitor placement and listening position, we must consider the room's acoustics.
Studio monitors sound best in acoustically treated environments. Therefore, it's optimal to invest in acoustic treatment for your studio control room, including absorbers, diffusers and bass traps.
An untreated room will cause a great deal of sound to reflect off the surfaces, producing echo, comb filtering and standing waves that will ruin any sense of neutrality we would otherwise get from our studio monitors.
If we can take care of our own listening environment for mixing, we can make better choices at the mix level, which will ultimately help with mix translation.
Note that another major benefit of monitoring on headphones is that headphones effectively remove the acoustic environment from the equation. Therefore, they're fantastic choices for non-ideal listening environments. They're also useful for those of us who mix in a variety of different of different acoustic spaces, as they offer us greater consistency.
Improving your monitoring doesn't necessarily need to be expensive. We can spend a lot of money on flatter monitors, greater acoustic treatment, better D/A converters, etcetera, but we don't have to. There are good studio monitoring options for most budgets, and acoustic treatment could be a few pieces of strategically placed furniture, for example.
That stated, having a good monitoring environment will help us mix more accurately, which will ultimately help, indirectly, with mix translatability.
Recap On Improving Our Monitoring
There are three key points to consider when improving our monitoring, and therefore our mix translatability:
1. The monitors themselves: choose monitors that give you as accurate a response as possible.
2. Monitor positioning: the monitors should be positioned correctly within the room and relative to the listening position.
3. Room acoustics: in order to get the best performance out of our monitors, the room must be adequately treated.
Points 2 and 3 do not apply to headphones, making them solid choices for consistent monitoring.
Get Comfortable In Your Monitoring Situation

Okay, better monitoring makes for better mixes, and better mixes tend to translate better. That makes sense.
But as we move forward with our mixes, it's critical that we become attuned to our monitoring system/environment and how mixes sound in our studios versus out in the world.
Ultimately, the only way to do this is to spend time listening critically with your monitors. This doesn't necessarily mean mixing, though mixing is certainly included. We can opt to listen to our favourite, most familiar music in our system to hear how those mixes come across in our monitors and room (or headphones).
There will be imbalances in your system. Whether it's the frequency response of the monitors (or headphones), room reflections, or the nodes and standing waves within the room, there will be characteristics that define your environment. Know what they are and understand how they will translate to other playback devices/systems.
There may be specific dips at certain frequencies in the room and boosts at others. It's important to know these characteristics and to compensate for them in our mixes.
Our favourite songs and our own mixes will sound different in our studio, and it's important to know why and how in order to improve our mix translatability.
There are tools out there, such as the Sonarworks SoundID, that can effectively calibrate our monitoring so that it's more accurate and “flat”.

This calibration strategy can be useful for flattening the response in any environment, making it easier to translate between studios if need be. It's also beneficial to hear things as accurately as possible (see Tip 1).
So, if you're interested in that, I'd encourage you to check out the Sonarworks SoundID for yourself.
Recap On Getting Comfortable With Your Monitoring
Regardless of your monitoring setup, it's imperative that you get familiar with how it sounds, understand the quirks of its performance, and how a mix that sounds one way in your environment will translate to other environments.
Monitor Differently Inside And Outside The Studio

This is perhaps the most expansive tip, so let's get into it one step at a time.
We've already discussed getting things right in our studios and getting comfortable and familiar with how our studios sound. Although this helps with mix translatability, the most direct way to improve mix translatability is to actually listen to our mixes on as many playback systems as possible.
This means inside and outside the studio.
Switching Monitors Inside The Studio
Switching our monitoring inside the studio has the following pros:
- We don't have to leave the studio.
- We can make necessary adjustments immediately in the mix.
- Referencing against other mixes is easy if need be.
Switching our monitoring inside the studio has the following cons:
- We cannot easily change the environment (the room) to any significant degree.
Changing up our monitoring inside the studio could be as simple as changing between our studio monitors and our headphones.
Getting a “different look” at the mix in this way can help us pinpoint issues that may not be present in our main monitoring choice.
However, we must be careful when changing between headphones and monitors as we'll likely get a remarkably different sound (especially in terms of detail and space, which are enhanced in headphones).
The more monitoring options we have inside the studio, the more we can understand how the average listener may hear the mix.
The different monitors will respond differently to the changes within the mix (balancing, equalization, compression, etc.) and help us make informed decisions throughout the process.
As well as practical core skills using different speakers can also help improve creative mixing skills. The use of reverb and delay in various pairs of monitors will react differently, with some monitors exaggerating the effects greater than others. This is particularly true when the various pairs are spaced differently (wider spacing leads to greater perceived width and a bit less centre).
In addition to multiple sets of dedicated studio monitors, we can also utilize different headphones. We can even opt to set up consumer-grade computer speakers and even mono speakers, earbuds, and other “low-end” referencing to help us gain a better idea of how the mix will translate to these more popular playback systems.
On another note, I also mentioned the benefit of being able to quickly A/B against any reference tracks we may be using. This can help us with mix translatability if we know that our reference track translates well. We can always A/B and work toward achieving similar mix results. I discuss reference mixes in more detail in Tip 5.
Switching Monitors Outside The Studio
Switching our monitoring outside the studio has the following pros:
- We can listen in virtually unlimited environments so long as we can access them.
- We can gather a better idea of how the end listener will hear our mix (hardly anyone will hear it inside your specific studio).
Switching our monitoring outside the studio has the following cons:
- We can't immediately make changes to our mix.
- Referencing against other mixes is more difficult if we need to A/B specific sections at a set loudness.
This is where we lose the theory and get straight into practice. When listening to our mixes in playback environments outside the studio, our mix will either translate well or it won't.
Listen for compatibility in other environments. Try out the following:
- Earbuds.
- Cell phone speakers.
- Home theatre system.
- Bluetooth speaker.
- Soundbar.
- Built-in laptop, computer and tablet speakers.
- Car sound systems.
- PA systems.
- Anywhere else you can imagine people listening to music.
Listen intently to the mix in these different environments. You'll likely find issues that make themselves apparent in new acoustic environments.
It's sometimes the case that, for some reason, the mixes we make that sound great in our studio environment fall apart in other playback systems. It's critical that we become aware of these issues and address them for good mix translatability before ever releasing the song or sending it off for mastering.
As we'll discuss in an upcoming tip (Tip 8), taking notes as we go through the process is a good idea. Mixing and matching our notes to find common issues will help tremendously in improving mix translatability once these issues are addressed.
Recap On Monitor Differently Inside And Outside The Studio
If you want your mixes to translate well across all playback systems, it's important to reference your mix across as many playback systems as possible.
This is true inside your studio, on multiple pairs of studio monitors, headphones, and even computer speakers. It's also true outside the studio, where we can reference our mixes on a wide variety of systems spanning from low-end consumer grade to hi-fi and everything in between.
Find Your Preferred Level But Monitor At A Variety Of Levels

Audio and sound can play plenty of mind games on us. If our mixes sounded the same everywhere, there would be no need for this article! But alas, that is not the case.
Although the audible range for humans is universally accepted as 20 Hz – 20,000 Hz, we do not hear all frequencies equally. We're naturally more sensitive to the mid-range frequencies and less so to the low-end and high-end.
Furthermore, as we age and damage our hearing, the highest frequency we're able to hear decreases from 20,000 Hz. For example, I can really only hear to about 16,500 Hz after too many loud jam sessions and shows. Although I know better now to take good care of my hearing, I expect that number to decrease as I age.
Our Ears' Frequency Response
But here's the kicker: the natural frequency response of our hearing changes as the sound pressure level we're exposed to changes.
Our ears' “frequency response” actually flattens out as we increase the listening levels, meaning that the balance of frequencies in our mix will change as we alter the monitoring levels.
This can be visualized in the Fletcher-Munson curves and the Equal loudness contours shown below:

Here, we have frequency on the x-axis and sound pressure level on the y-axis. The lines represent phon, a logarithmic unit of loudness level for tones and complex sounds.
We can see a region in the 2 – 6 kHz range where we will hear sound well below the 0 dB SPL “threshold of hearing”. Conversely, we will need much more sound pressure (above 0 dB SPL) to hear the lower and high frequencies. The relative imbalances in perceived loudness between frequencies begin leveling out as sound pressure levels increase.
So, monitoring loud will make the low-end and high-end more present in the mix. Monitoring quiet will focus our hearing toward the mid-range. Take this into account when mixing.
Generally, it's good to mix relatively quietly to maintain our hearing health and avoid ear fatigue over the course of the mixing session.
At 85 dB SPL, we can listen for about 8 hours before hearing damage begins setting in. I generally mix at a lower level than that to play it safe.
Mixing loud and quiet for short periods is useful for gathering a better picture of mix translatability (how the mix will sound loud or quiet). However, we will likely find the most benefit by landing on a standardized SPL level to mix at, where we can train our ears at that specified average loudness.
We can test for sound pressure level with a decibel meter. The Galaxy Audio Check Mate CM-130 is a great option that reads accurately between 40 and 130 dB SPL.

What's more, is once we have a preferred mixing level, we can get comfortable at whatever our ears' natural frequency response is at that level and, therefore, have greater consistency across each of our mixes (see Tip 2 on getting comfortable).
Monitoring at consistent levels like this can help tremendously with mastering, not only because we're more comfortable with our preferred monitoring level, but because it helps level the proverbial playing field across multiple songs (assuming we're mastering an album).
Recap On Monitoring At A Variety Of Levels
Finding a comfortable, consistent mixing level will train your ears to hear mixes more consistenty in your studio, helping you to listen critically and accurately.
However, when mixing, it's even more important to monitor at a variety of levels to ensure your mix sounds good at low and high volumes. Pay special attention to hear if all the most important element are present when monitoring low and that the low and high ends are mixed appropriately when monitoring high.
Use Reference Mixes

A reference mix (or reference track) is an audio mix/track that we can compare our work against as we make our way through the mixing process. A reference track is typically in the same style/genre as what we're working on and acts as a goal post to work toward in terms of mix aesthetic.
Generally, a reference mix is a commercial release in the same or similar genre as the mix you're working on. It should act as a sort of “goal post” to work toward in terms of the overall mix aesthetic. In other words, we're typically trying to match the general sound of the reference.
In addition to being a goal post in terms of mix aesthetics, a commercially released reference track will generally have great translatability, too.
If we choose reference mixes that translate well and mix our sessions similarly, we'll also get the benefit of improved mix translatability.
Referencing our reference mixes can be done inside and outside the studio.
When using our reference mix(es), we should ask ourselves questions about how the different elements compare. Here are a few example questions worth considering:
- How upfront is the lead vocal?
- How are the drums and cymbals panned?
- How loud is the snare drum?
- How do the bass and kick drum interact?
- How much reverb and space is there?
- How loud are the lead elements relative to the rest of the mix?
- How wide is the mid-range? What about the high-end?
- How are the mid-range instruments panned?
- How much low-end is in the bass?
- Does the bass cut through in the mid-range at all?
Recap On Using Reference Mixes
One of the best ways to test whetheryour mix will translate well or not is to reference it against a mix that you know translates well. If you can match the overall mix aesthetic of your reference, then you'll have a mix that translates well, too.
Monitor In Mono

Mono compatibility is one of the most important concerns for mix translatability due to the vast number of playback devices/systems designed in mono. These systems include public address systems, smartphones, laptops and Bluetooth speakers.
Not all playback systems will be in stereo, and even when they are, the end listener may not be positioned optimally to hear the stereo balance ideally.
Mono compatibility is the practice of ensuring unsubstantial changes in frequency content as a multi-channel (typically stereo) recording is summed to mono.
The easiest way to test for mono compatibility while still in the mixing process is to reference the stereo mix in mono periodically. This can be done by summing the mix bus to mono.
Summing to mono effectively collapses the stereo image. The differences between the left and right channels are lost, and we're left only with the sum of stereo channels.
If the left and right stereo channels are identical, we basically have mono already.

If the left and right stereo channels are completely out of phase, they'll entirely cancel each other out when summed to mono.

We should mix somewhere in between these two extremes when working in stereo, though closer to “identical” than “completely opposite”.
Phase correlation meters can help us understand how our left and right channels relate to one another. These plugins are stock in digital audio workstations and span continuously from -1 to +1 or from 180º to 0º. They can be put on stereo tracks or the stereo mix bus to meter the phase relationship between the left and right stereo waveforms.
At +1, we have a 100% correlation between the channels (they are exactly the same).
At 0, we have the “widest permissible left/right divergence” or the widest permissible stereo image.
Having the mix bus correlation meter moving between 0 and 1 is ideal. Smaller variations mean smaller differences in width.
At -1, our left and right channels are completely out of phase and will completely cancel each other out.
Mix bus correlation meter values between -1 and 0 mean that significant phase issues are present that will interfere with the stereo audio and definitely with the summed-to-mono audio.
It's best to hover between 0 and +1. However, we may want our mixes a bit closer to +1 to ensure better phase relationships between the left and right channels and, therefore, better mono compatibility.
Any phase/amplitude differences between the left and right channels (which are necessary for the stereo effect) will interact with each other more directly in mono, causing destructive interference. The greater the differences, the greater the destructive interference.
The tracks and effects panned to the centre will be the same. However, any off-centre information will inevitably be altered in the summed-to-mono mix.
So periodically summing our mix to mono to ensure we're maintaining proper mono compatibility will inevitably help with mix translatability to mono systems (and often to other stereo systems as well).
Recap On Monitoring In Mono
Not all playback systems will be in stereo, and even when they are, the end listener may not be positioned optimally to hear the stereo balance ideally. If you want your mixes to translate across all systems, it's worth ensuring they translate to mono playback by periodically monitor in mono by summing the mix bus to mono.
Mix With Reduced Bandwidth

This is another tip that takes into account the playback systems of the end listeners. We cannot ultimately control how our music is listened to once it's released into the world.
Audiophiles may listen on top-of-the-line equipment in sonically accurate rooms. Most people will be listening in relatively poor environments like the car or through consumer-grade equipment like earbuds, smartphone and laptop speakers, Bluetooth speakers, etc.
Even if your song gets placed on radio rotation, it'll likely be compressed to death anyway, which will mean relatively poor translation.
Let's focus first on consumer-grade playback equipment. It's often the case that the mid-range is pretty well represented but that the high-end and especially the low-end leave something to be desired.
If our mixes are to translate to these systems (yes, we need to cater to the lowest common denominator here), we need them to sound great in the mid-range.
Therefore, a strategy for improving mix translatability is actually band-pass filtering the mix bus and focusing our efforts on mixing just in the mid-range.
In addition to mix translatability, the bulk of the musical information, transient information and frequency masking will happen in the mid-range, so it's critical that we get this band as perfect as possible anyway.
So then, we can opt to band-pass the mix bus to focus our attention on the important mid-range frequencies. I typically high-pass around 200 Hz and low-pass around 4,000 Hz, though you can go wider or narrower depending on your mix and your mixing skills.
By focusing on this range, we can hear how the mid-range elements interact and work to improve separation between the elements. Work this strategy in conjunction with summing to mono to greater effect.
We can also hear how bass elements will be heard on lesser playback systems. If the bass and kick drum can't be heard in the mid-range because all their energy is in the low-end, these elements likely won't translate well to other systems.
The same can be true of elements with high-end brilliance energy.
When monitoring through such a filter, we can also A/B against our reference track (see Tip 5), passing it through the same filter as well. This way, we can hear how our mix relates to a commercially released track in terms of overall aesthetic and translatability.
Many referencing plugins can solo out specific bands so that we can more easily A/B between our mix and the reference(s). My preferred option for doing so is Mastering The Mix's Reference 2.

We can apply this same strategy (along with mixing in mono and using reference mixes) to better understand the translatability in the low-end and the high-end. However, the mid-range is arguably the most important to get right when it comes to achieving the best overall mix translatability.
Recap On Mixing Filtered Bands
The most important information for mix translatability is in the midrange, so if we can hear everything appropriately with the low-end and high-end rolled off (either with a band-pass filters or a combination of a high-pass and low-pass filter on the mix bus), then our mix will likely translate well.
Assuming the high-end and low-end aren't completely messed up, they'll often take care of themselves as we focus our efforts on mixing within the midrange.
Take Notes And Make Necessary Adjustments

Now that we have a few good strategies for improving mix translatability, we should put them into action.
As we move through the mix, listening critically to what we can do to improve, we should be taking notes.
It's often the case that we'll hear multiple things that require attention. Rather than jumping directly into one issue, we can take a bit of time to write a checklist of issues we should be addressing. This way, we can quickly move forward without losing our ideas throughout the mixing process.
Once we have our notes, we can opt to tackle the largest issues first. It's common that fixing one big issue will resolve many of the smaller issues of mix translatability as well.
Recap On Taking Notes
Writing down how our mix translates to other systems will give us a to-do list for optimizing our mix translatability.
Hire A Mastering Engineer
Mastering covers a lot of different goals in music production. It produces the correct file formats at the right levels for different playback media and streaming services. It enhances the mix and maximizes the potential loudness. It's also the last stage to improve the final product's translatability.
Once we've exhausted our own resources and skills to make the best mix we can, hiring a mastering engineer can help take our mix to the next level. This, of course, includes next-level mix translatability.
Good mastering engineers will have the equipment, playback systems/environments, experience, and ears to enhance your mix through mastering properly.
Recap On Hiring A Mastering Engineer
Getting a second pair of ears and a professional opinion on your mix can help tremendously in pointing you in the right direction for mix translatability.
Practice Critical Listening

Critical listening happens when we listen to music with a keen focus on the technical aspects of the sound. Technical aspects include but are not limited to, the frequency response, dynamic range, tonality, and balance (in levels, in space, etc.).
Critical listening is essential when mixing to get the best, most detailed results. It's also an invaluable habit to develop as we listen to other music both inside and outside the studio.
Paying attention to the mix and even taking notes (see Tip 8) can help strengthen our ability to understand what to do and when to do it in a mix. As we develop our critical listening and our mix translatability skills, we'll continuously improve our mixes as a whole.
Ear training is a great way to practice critical listening at the micro level. Train Your Ears is a great system that I can recommend. However, the end goal is to listen critically to mixes as a whole.
In addition to the technical aspects of the mix, be sure to pay attention to the production value and the arrangement. These aspects can be a bit easier to grasp in the context of the mix than specific mixing techniques. Consider how the instruments are panned, how the mix transitions between sections, etc.
Recap On Critical Listening
Improving your critical listening will make your troubleshooting and mixing instincts better, helping you to achieve mix translatability much more easily.
Call To Action!
For your next few mixes, try mixing them to the best of your abilities on a single monitoring system (studio monitors or headphones). Once you feel good about the mix, bounce it out and proceed to listen to it in a variety of different playback systems and environments (earbuds, car stereo, bluetooth speaker, home theatre system, etc.) and make notes in each environment as to what sounds good and bad about the mix.
Return to your DAW and compare you notes to what you hear in your studio.
After a few listens through a few different mixes, you'll begin recognizing patterns of what translates well versus what doesn't. You can keep these potential issues in mind whenever you mix in your studio moving forward.
Have any thoughts, questions or concerns? I invite you to add them to the comment section at the bottom of the page! I'd love to hear your insights and inquiries and will do my best to add to the conversation. Thanks!


